Sunday, November 28, 2021

Make Your Own Bath Salts

I came across this recipe in a favorite cookbook of mine, The American Country Inn and Bed & Breakfast Cookbook, Volume 1, by Kitty & Lucian Maynard. It makes for a wonderfully fragrant, silky soak, but you must remember to be very careful about slipping when adding water softener and/or oils to your bath water!

*I do not know if you can still buy Calgon water softener, but I do know you can still buy their bath beads, which are scented, and also have moisturizing properties, so they would probably work as well.

The addition of the essential oil is something I've not tried, because I enjoy the scent of the Calgon, but it might be a nice addition. I got the idea from The Mamas Girls blog.

The Queen's Bath Salts
From The Queen Victoria Bed & Breakfast, Cape May, NJ
Makes 6 cups, enough for 12 baths

3 cups Epsom salts
1½ cups baking soda
1½ cups Calgon powdered water softener, in the laundry aisle*
10-20 drops essential oil, optional

Combine Epsom salts, baking soda & water softener in a mixing bowl. If desired, drop in the essential oil, and whisk until well incorporated.
Pour a half cup of bath salts into your bath water, and enjoy! (Be careful of slipping!)
Keep bath salts in a closed container.


Monday, October 4, 2021


Makes 36 cookies

Just Make These!


¾ cup butter (I always use salted), reserve the butter wrapper
¾ cup/100gm light brown sugar, packed
1 large egg yolk
1½ cups/180gm King Arthur AP flour
¼ tsp. salt
1 14-oz. can Eagle Brand sweetened condensed milk
2 Tbs. butter
2 tsp. vanilla extract
12 oz. chocolate chips (I like Aldi's dark chocolate chips)
1 cup Almond Brickle or Heath Bits

1. Preheat oven to 350°. Grease or spray a 9x13" cake pan; set aside.

2. In the bowl of a stand mixer, beat together the ¾-cup butter and brown sugar until smooth, about 3-5 minutes. Add the egg yolk, and beat in well. Stir in the flour and salt.
Using the buttery side of the butter wrapper, press the dough into the greased cake pan, in an even layer. Bake at 350° for 20 minutes. Cool in pan on a wire rack while you finish  preparing the toffee layer.

3. Meanwhile, in a medium, heavy saucepan, stir together the Eagle Brand and the remaining 2 tablespoons of butter over medium heat, stirring constantly., until bubbly. Cook and stir for an additional 5 minutes once the mixture comes to a boil, stirring constantly and scraping down the sides of the pan. Remove from heat and stir in the vanilla until incorporated.

4. Spread the toffee evenly over the baked layer, using an offset spatula, so you don't burn your hand (like I did.) Return the pan to the oven, and bake for an additional 12-15 minutes, until the toffee is golden. Clean the offset spatula for the next step.

5. Remove pan to stove top, and sprinkle chocolate chips over the top evenly. Return the pan to the oven for another 1-2 minutes. Remove pan from oven (turn oven off), and place on a wire rack. Spread the melted chocolate evenly over the cookie base.

6. Sprinkle the chocolate evenly with toffee bits, and press in, lightly. Cool on the rack for 1-2 hours, then cover and chill for several hours or overnight. 

7. Remove cookie layer from pan, (it comes out easily), and place on a cutting board. Using a chef's knife, cut it in thirds down its length, then cut each long bar in half. Each of these halves gets cut into three 2" bars (I use a ruler), then each bar is cut on the diagonal, to make 36 triangles.

Store airtight in the fridge (or not - I don't) for up to one week.

Enjoy!  These make great Christmas gifts for friends and family.

Wednesday, March 31, 2021

DIY Ink Cube Holder from foam core


I have seen (and coveted) those ink cube holders on YouTube that all my favorite paper-crafters use, but, cheapo that I am, I figured I could probably make one myself from foam core board. 


Here's how I did it:
I cut closely around the base of the ink cubes with a very sharp X-Acto knife, rounding the corners like they are on the cubes, and cutting completely through to my cutting mat. I glued the piece with the cutouts to a solid piece of foam core, and am thinking of gluing a piece of that rubbery, webbed sheet that keeps things from slipping (what do they call that, anyway?), so it won't move around on my desktop.


The cubes and their lids fit in it so snugly, I can turn it upside down without them falling out! It holds 4 cubes and their prospective lids, or I can use both the front and back rows for just the ink cubes, if I'm doing a lot of colors. 
I'm pretty much in love.

Monday, January 18, 2021

Printable Swatch Chart for Ohuhu 72 Alcohol Marker Set


I recently bought a set of 72 Ohuhu alcohol markers, and wasn't able to find a blank, printable swatch chart that I liked, so I made one. If anyone is interested in printing it out, click HERE for the link to the file. Happy Crafting!

Thursday, April 2, 2020

How to Access Your Linked Cartridges in Desktop Cricut Design Space

Since I don't think anyone is actually reading this, I am posting the directions for how to access your purchased Cricut images that you've already linked to your account, in the new (2020 v5.7.24) version of Cricut Design Space, so that I can find it again, instead of spending a couple hours in Frustration-ville. I looked everywhere online, after spending a ton of time trying to find it on my own - all to no avail. So, Eureka! - I just found it, and here it is, in case anyone else is looking for their purchased cartridges. (Cricut keeps improving Design Space, but every time they do, something disappears down a rabbit hole.)

So first, in Design Space Desktop, click on 'New Project', then click on 'Images'.


In the left column, at the top, under "Highlighted categories", choose "Image Sets", then on the left, click on "Ownership", then "Purchased". Magically, your cartridges will appear!!!


Monday, May 6, 2019

Mini Egg Frittatas with Cherry Tomatoes


This is an adaptation of a REALLY delicious recipe from Fresh Thyme Farmers Market that is, sadly, no longer available on their website (don't you hate that?). It makes the BEST little egg frittatas in a muffin tin, that I've ever made, and if you check my Pinterest board, you'll know how many of these recipes  I've collected and tried. The cherry tomato halves make the frittatas, so don't skip them.

Mini Egg Frittatas with Cherry Tomatoes
Makes 12 regular-size muffins

  • Non-stick olive oil cooking spray
  • 2 tsp. extra virgin olive oil, divided
  • 1 (5 oz.) pkg. baby spinach, rough chopped
  • ½ of a large red bell pepper, diced small (¼")
  • ¼ cup finely chopped onion 
  • 1 tsp. minced garlic
  • ½ tsp. crushed red pepper
  • 7 large eggs
  • ¾ cup 2% milk (I use 1%)
  • 1 teaspoon fine sea salt (or Kosher)
  • ¾ cup (90gm) shredded sharp Cheddar cheese (I use 1 T. Kraft fat-free cheddar per muffin = ¾ cup) 
  • ⅓ cup chopped sun-dried tomatoes (I use dry pack) 
  • 2 oz. deli ham, chopped small
  • 18 cherry tomatoes, halved

1. Preheat oven to 400°F. Spray a 12-cup, regular muffin tin with cooking spray.

2. In a 10-12" skillet, heat 1 tsp. oil over medium high heat. Chop spinach and cook for 3 minutes or until spinach is wilted, stirring constantly. Add garlic and crushed red pepper flakes, and cook for 1 minute more. Transfer spinach mixture to a clean kitchen towel or several layers of paper towels, cool for 5 minutes, and wring over sink to remove moisture (hot!); set aside in a medium bowl.

3. In the same pan, heat remaining 1 tsp. oil over medium heat. Cook bell pepper and onion for 3 minutes, or until tender. Add to spinach mixture


4. In a small mixing bowl with a pouring lip (or a 2-4 cup glass measure), beat eggs, milk and salt together; set aside.

4. Layer the spinach mixture (with the bell peppers and onions), cheese, sundried tomatoes, and ham evenly in the cups of the prepared muffin tin. 

5. Add egg mixture to each cup, filling almost, but not quite, to the top. (If you come up a little short on the last few, just borrow some of the liquid from the other cups  until all are evenly filled.) Top each muffin with 3 cherry tomato halves, placing them with cut-sides up, and slightly embedding them into the muffins. 

6. Bake 15-20 minutes, or until egg mixture is set and tops begin to brown (mine took 19 minutes). Cool 5 minutes in the pan before serving. (They will be beautifly puffed when they come out of the oven, but will, sadly, deflate as they sit. Still scrummy, though!) Serve as is, or with salsa and sour cream. These reheat well in the microwave on a medium power (5), until warm (microwaves vary, so I'll leave the time up to you - start with 20 seconds, and go from there), and they also freeze well, and can be reheated while still frozen, though I don't remember how long it takes ... do use a gentle power setting when heating/reheating an egg dish, though. I like '5' on my microwave.

I hope you try these - my delicious! ❤️

Saturday, April 7, 2018

Old Fashioned Cherry Crisp

This is one of those just plain, down-homey kind of recipes. It goes together in just a few minutes, and tastes like Grandma made it. (Hey, I did!) 
I modified the recipe from another site, by halving the amount of sugar and flour, eliminating some unnecessary vegetable shortening, and adding some almond extract. I hope you give it a try - with a scoop of vanilla ice cream, of course.
I use King Arthur all-purpose flour, which weighs in at 120gm a cup, if you weigh your ingredients. Your flour may weigh more per cup.


 Old Fashioned Cherry Crisp


Makes 8 servings

Filling:
3 14.5-oz. cans (6 cups) pitted tart cherries, drained
¾-1 cup (150g) granulated sugar
⅜ teaspoon pure almond extract
3 tablespoons all-purpose flour
Pinch salt, optional
Pinch cinnamon, optional

Topping:
3/4 cup (90g) all-purpose flour
1/2 cup (40g) old-fashioned oats
1/2 cup (100g) light brown sugar
1/4 teaspoon kosher salt
6-8 T. salted butter, cut into ¼" slices


  1. Preheat oven to 375°F. Butter an 8x8" baking dish.
  2. In a medium bowl, combine all of the filling ingredients, and stir well. Pour into the prepared baking dish. 
  3. In a food processor, combine the flour, oats, light brown sugar, and kosher salt. Pulse a few times to combine. Cut in the butter to make small crumbs, about 5 pulses in the food processor. Pour over top of the cherry mixture, and smooth out. 
  4. Bake at 375° for 40-50 minutes, until bubbly and light golden brown. Allow to cool for 15 minutes before serving with a scoop of vanilla ice cream.

Saturday, March 10, 2018

Scioto Hills Peanut Butter Bars

The recipe for these luscious bars came from a Christian camp that our church supports, in southern Ohio. They are wildly tasty!

Scioto Hills Peanut Butter Bars

Yields: 24 bars

Ingredients:
 1/2 cup/115g butter, softened
1/2 cup/113g sugar
1/2 cup/100g brown sugar
1 large egg
1/2 teaspoon vanilla extract
1/3 cup/85g creamy peanut butter (I use Jif)
1 cup/130g all-purpose flour (I like King Arthur)
1/2 teaspoon baking soda
1/4 teaspoon kosher salt
1 cup/80g old-fashioned oats
Frosting recipe follows

Preheat oven to 375°F.
In a stand mixer, combine butter, both sugars, egg, vanilla and peanut butter until smooth.
In a separate bowl, combine flour  baking soda, salt and oats. Add to wet ingredients, and beat only until just combined.
Press into an ungreased 9x13" pan. Bake 15 minutes, until edges are light golden brown. Don't overbake.
Frost when cool.

Frosting:
3/4 cups/94g confectioners sugar
3 tablespoons /47g creamy peanut butter
1/2 teaspoon vanilla extract
1 tablespoon + 1 teaspoon Milk or half & half - to make a spreading consistency

Beat together frosting ingredients; frost cooled bars. Cut bars 4 across by 6 down, to get 24 approximately 2x2" bars.

Wednesday, April 5, 2017

Grammie is having a blast!


I once heard a young mom say, "Why bother sewing? You can buy clothes so cheaply nowadays." Hmmmmm. But then you wouldn't get the joy of seeing someone twirl in her new, little dress, with delight written all over her face. I have been a professional dressmaker for 35 years, and there is no client I like sewing for better than my little granddaughters. I have been making a few things lately, plumbing the depths of the Internet for all the fantastic FREE sewing patterns people so generously post, along with some of the great buy-able patterns, and thought I'd share a few of the things that I've made - both recently and in the distant past.


I made this darling little baby dress from a free bodice pattern I found on sewjereli.blogspot.com.au. It is for a size 6-12 month dress. I added a placket, as described in her tutorial, and I changed it into a bubble dress by determining the desired finished length, then add 3 inches to that length for the main fabric, and subtracting 2" from that length from the lining fabric. The lining was a rectangle cut 10 inches wider than her waist measurement, and the skirt fabric was a rectangle cut 3 times her waist measurement. I gathered the bottom of the skirt to the lining and stitched, right sides together, then gathered them together at the top edge with wrong sides together. After stitching, I removed the gathering stitches, then gathered the two layers together to attach to the bodice, as the tutorial indicates. I also added a flat piping to the seam between the bodice and skirt. Hard to see in the picture, but the fabric is a sweet little dotted Swiss, that I bought 2 years ago (long before the baby came along), at Joann. I bought 2 yards, and I had enough to make this dress, plus a full skirt for my 8-year old granddaughter, and a circle skirt (twirly - yay!) for my 4-year old granddaughter (the baby's big sister.) Got my money's worth out of that one!


My daughter sent this picture the other day, of her little sweetie wearing a nightie that I'd made her mommy when she was 5 years old. It has a matching robe, and the gown has an embroidered piece on the bodice that says, "Je Taime" ("I love you", in French.) I made it back in 1987, using a McCall's Enchanted Forest, Little Darlings #8261 (Note the price!) It is an adorable pattern, and you can still find it on Ebay, even though it is out of print.


This last one I made is called The First Day dress, from MADE. She wore it on her first day of kindergarten, and now her little cousin, who loves the dress, Lily, is wearing it. It's lined with hot pink, which peeks out at the neckline with a little faux piping, and in the side-seam pockets I added to the pattern.

Love 'til next time, Laura

Friday, August 5, 2016

Continued: Updating a Builder-Basic: Installing an Ikea Sektion kitchen

Progress!


As you can see in this picture, I originally designed the island to have two 12" wall cabinets on the backside, one of which would have the side removed, and the door screwed shut, to provide a couple shelves for display and cookbooks, but I changed my mind on this, to make more room for kitchen stools. We ordered our appliances from Sears, and kept going back every time they had them for a lower price. We ended up saving several hundred dollars over the original "sale" prices. This made up in part for the fact that Ikea decided not to have their annual kitchen sale the year we decided to put in an Ikea kitchen. Bummer. (It's going on right now, through the end of August, if you're interested.)

Next up was counter tops. We had been without counters or a kitchen sink for about 3 months, doing dishes in the bathtub. Oh, what a joy that is. Needless to say, we went through lots of paper plates and cups, and ate lots of takeout. Couldn't wait to cook in this kitchen! 


This is "our" slab! It is Delicatus granite from Brazil. It has a creamy white background that goes well with the Bodbyn white cabinets, with dramatic slashes of black throughout. There are hints of copper and white mica that catch the light and add sparkle to the kitchen, along with clouds of a buff color. it was just what we were dreaming of. It was a happy day when they came to put it in. I will not mention the name of the company we bought it from - there are several things that we should have known to ask about, since this was the second time we had had stone installed in a kitchen. One major thing was the "templating" process, which is exactly what they called it when making the appointment. The last time we had granite put in, the guy actually made a template - imagine that! - taking an exact pattern of our walls and appliance placement. This time, the guy just measured, and consequently, they did not scribe the granite to the walls, and my stove just barely has 1/16th of an inch to slide in and out of its space. They put the island top on crooked, with NO overhang on the drawer side, where all the crumbs would be being swept into my hand, and consequently onto the floor. They came back and corrected this, but the fact that it wasn't scribed to the walls gave me major headaches when I was installing the tile backsplash. Just hope this makes someone else more savvy when they go shopping for an installer.


On another note, my sister and her husband came to visit in the midst of our kitchen renovation, and they - honestly - told me that the oak buffet didn't go with anything in the new house. They were right! I had considered painting it for years, but never had the guts. It had been abandoned, along with a matching table and chairs! - in a house that my husband's parents bought many years ago. I had stripped and re-stained it once. Here's the before:


And here's the after, as it currently looks, painted the same color as the Ikea Bodbyn cabinets - using Valspar "Lamb's Wool", mixed in Behr Marquis semi-gloss. Can you believe someone would just leave that behind???! It looks like a big ol' wedding cake, now, and provides lots of needed storage. It makes a nice extra serving area in our dining area. 


 The old, galvanized can on the buffet is a chicken feeder that I found in an abandoned chicken coop in the first house my husband and I owned. The chippy old tea kettle was also bought on vacation at a flea market in Pigeon Forge, where we also found the iron barn pulley, and are still looking for the perfect place to use it. (Maybe holding the lights over the pool table?) We found the old, black-painted window in an antiques shop in Pigeon Forge, TN, while we were having the house built last year. I cleaned it like crazy, then sprayed the back of the glass with Krylon's "Looking Glass" paint. That is amazing stuff! It looks just like a mirror, and reflects the light from the door, brightening what could have been a very dark corner. The platters, pitchers and bowls up top I have been collecting for years, along with a few old ladles & a potato ricer. The frilled cake plate was purchased on a trip to Fenton Glass with my mom when I was in junior high school. The white watering can was a recent buy at Ikea. I use it all the time for houseplants and to water my pot-grown cherry tomatoes and flower pots on the back porch. The little silver mug is the Adams' baby cup, monogrammed with an 'A'.  I made the curtains with indoor/outdoor fabric from fabric.com.


The shelf is a regular old 2x10 from Home Depot, which I pre-conditioned, then stained with Minwax "Honey" stain. (I used the same wood and stain to make the cookbook shelves in the kitchen.) We made the shelf supports from 3/4" black pipe and plumbing parts, also from Home Depot, and I ordered some pipe ends (to plug the holes) on Amazon, here. Easy-peasy to make. I got the idea from this blog post.


We recently painted this wall and the wall behind the buffet in Martha Stewart 'Seal' - an absolute favorite dark, warm gray. All the white just pops with it, and it makes the walls recede, so the space feels bigger. It really draws your eye to the woods out back.


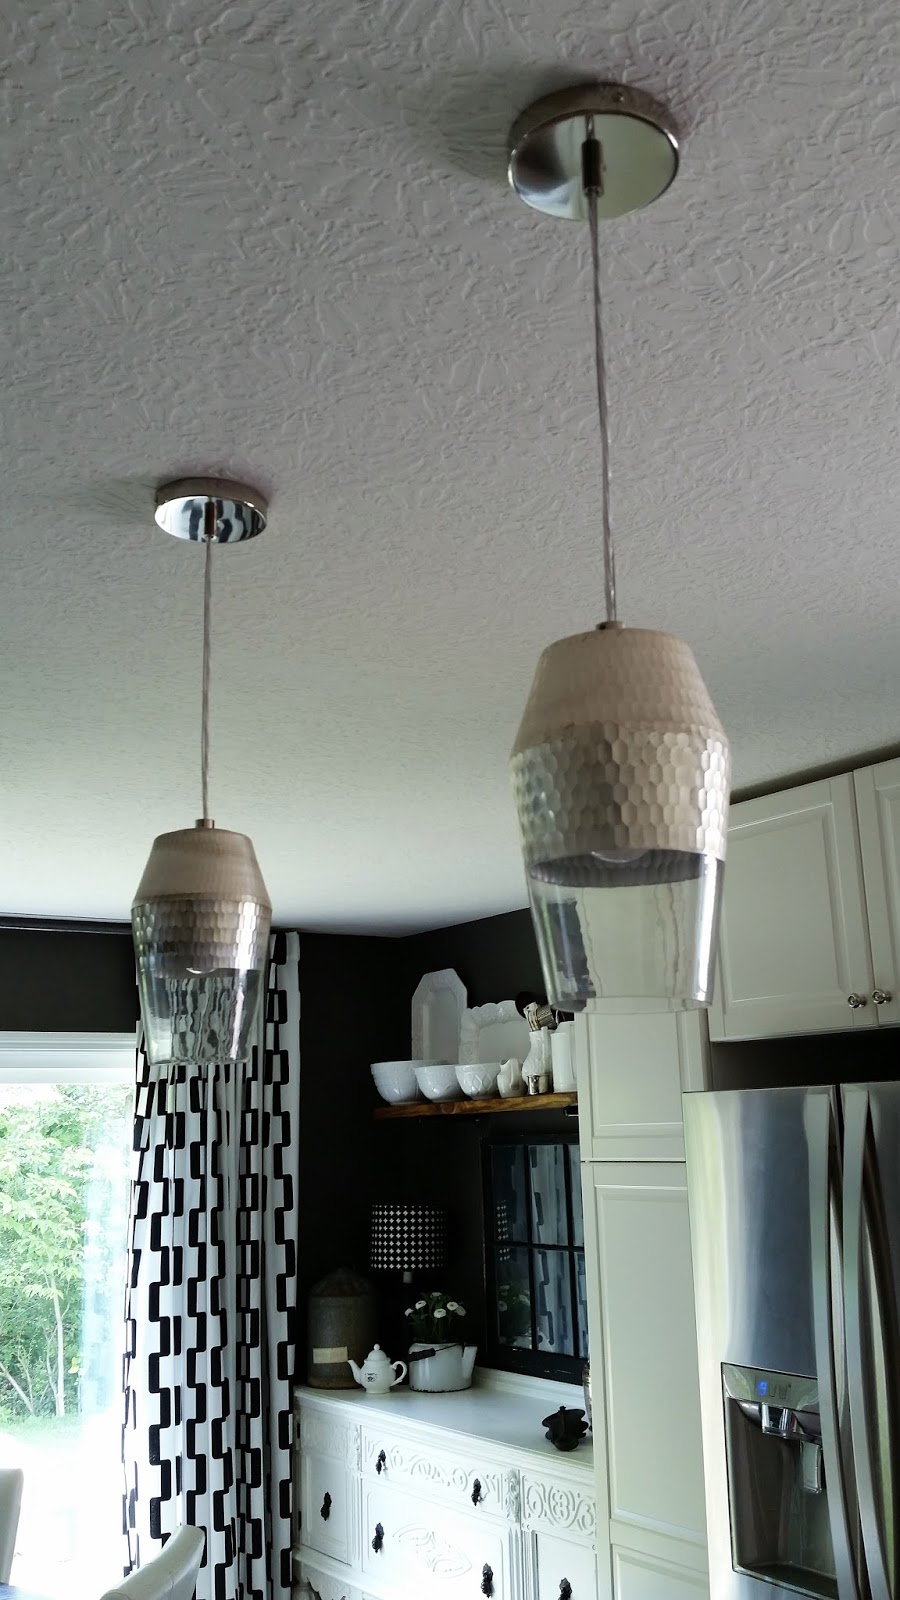
The light over the kitchen table has a faceted lampshade, and a diffuser. Somehow, the faceted motif kept showing up in different items we picked up. Don't you love when that happens? 

The table itself I found in a thrift store for $5, but the original top was only 36" in diameter. I wanted to be able to seat 6 comfortably, so I started perusing Craig's list, and found a 48" table top which had seen better days, for $20. I sanded and stained it with a black gel stain and attached it to the base. We can easily seat 6 around it, now, with two more at the island, and for Thanksgiving, we brought in another extendable table and seated 14.


Next up: Kitchen reveal, pre-molding


Wednesday, August 3, 2016

Updating a Builder-Basic House

Soooo, after many months away from posting anything on this blog, I am back to show you what we've been up to in our new, little house. We went for the "Modern Farmhouse" look of this elevation, and are trying to incorporate a few farmhouse touches into our contemporary aesthetic. I read that you should choose:

Do you want to live in a farmhouse with a few contemporary touches,
or do you want to live in a contemporary house with a few farmhouse touches? 
The latter was the way we wanted to go.


We decided a year and a half ago to downsize to a place with fewer steps (ahem = old knees), and fewer rooms to take care of, so we could travel and enjoy our retirement. We went from a 2500 square foot 4-bedroom, with a partial basement, to a 1500 square foot 3-bedroom, with a full basement (with 9-foot ceilings!). At first I thought, "Will I ever love this little house the way I loved our old one of 16 years?" And at first, I struggled with it. Every house we've ever bought, we bought because it felt like "home", and because we fell instantly in love with it. This house we bought because it was the least expensive model in the neighborhood we wanted to be in. My husband promised we would make it the house we wanted it to be, and he has kept that promise, as far as we've come on it. (Still a work in progress - the kitchen still needs to be trimmed out, before moving on to the Home Office/Sewing Room, painting out the awful builder's grade paint that marks when you breathe on it, as we go.)


The first thing "we" did was to upgrade the lighting from the ONE light in the center of the kitchen ceiling. My hubby did this - I don't do electrical. While he worked on this, I unpacked. I'm still unpacking. This is my lived-in kitchen shot (waffles on the counter, various stuff that doesn't know where it wants to live in this little house, yet, on the island), showing all the glorious lighting (and outlets and switches) that sweet man put in for me, crawling around in the attic in AUGUST in Ohio!

The next thing on the list was to remove all the-very-cheapest-they-had-to-choose-from flooring that we had them put in, and replaced it with wide-plank European white oak engineered hardwood. It's gorgeous - 7½" wide planks, warm with a slight grayish tinge to it. It was a huge, wearying task, but we plugged away, and got 'r done.


We are in our 60's, folks! We do have quite a bit of DIY experience under our belts, born out of necessity (SAHM, and one faithful wage earner.) If we can do it, anybody can!

I love to cook, and the original kitchen was - let's just say, not what I had become accustomed to. (I just went through all the photos I've taken in the past year and a half, and I have NO photos of the original kitchen. Tell you something? Hated it.) So, we tore it out (it will go into the finished entertainment area in the basement), and put in an Ikea "Bodbyn white" Sektion kitchen, ourselves. A lot of work, but oh, so pretty and organized! Almost all drawer bases - YAY! The only doors we used on the bases were the under-sink cabinet, the lazy Susan and the tall pantry cupboard. Oh, I also slipped a 9" cabinet from Home Depot (with a raised panel that pretty much matches the Bodbyn cabinet fronts, painted in "Lamb's Wool") into the space between the fridge and dishwasher, with a pullout linens rack from Ikea for kitchen textiles. It also houses our toaster.


This is the mountain of boxes we packed into the back of my brother's pickup, to drive the two hours back home. This was the first of many trips to Ikea in the course of finishing the kitchen. Next summer, they're opening an Ikea in our hometown. Of course. I read lots of stories online telling one to immediately check the contents of all packages, because Ikea wouldn't accept any damaged returns after three days. Poppycock. They were very nice and accommodating to us during the course of the project.


Assembling a Sektion kitchen works best as an assembly line operation. I used the thick cardboard packing material to protect the surfaces of the cabinets while assembling them. One tip about an Ikea kitchen: we purchased the metal reinforcement bars that span the sink opening to support a stone slab, and our granite guys quickly removed it before installation.


Once you get the rails level on the wall, it's pretty much a piece of cake from there. A heavy piece of cake, but cake, just the same. We designed and built out own platform for the island, and we found the panels to cover the sides and back, at Lowes. We added some 1/4" luan to each side of the panels to make them fit, then caulked and painted them.


We also created our own microwave cabinet next to the stove, because Ikea does not offer one. We used a 24"w x 40"h cabinet frame (without the top piece added), dropping the hanging rail down 5" from the height of the other cabinets. We used 30" doors, mounted 15" from the bottom of the cabinet
which brought them even with the other doors in the kitchen. The "roof" of the microwave shelf is the bottom shelf in the cabinet when you open the doors. In order to make the cabinet match the others in height (and also have holes in which to mount the top hinges), we cut off the top of an extra 24"w x18"h cabinet frame, and used pocket hole screws to attach it to the top of the cabinet side walls (you have to stand on a ladder to see the seam). Its very sturdy, and the only weight the top portion bears is the weight of the doors.


Next we created an oven hood from a 30x40" cabinet with the sides shortened 5", and a 5" drawer front attached from the back with screws. As you can see below, we also did not put the back on the cabinet. It is screwed into the sides of the cabinets on either side of it. We used a hood insert, purchased from Amazon here, which I LOVE. We ordered one "Like New" from the warehouse, and it was perfect. I've always only had those worthless, non-ducted hood vents that blow everything right back into your kitchen. The difference is night and day. My husband did all the duct work, and vented it to the outside. Lovely! I changed out the light bulbs for 40-watt equivalent LED's, with a candelabra base. I wanted 60-watt  bulbs, but they apparently don't make them yet with that type of base. As it turns out, the two 40 watt bulbs are just fine for lighting the stove top. I still need to get a shelf for the interior of the hood cabinet, for storing over-sized cake pans, and maybe a new ice cream maker??? We will add cleats to the back wall to support the shelves along with the standard shelf supports and cut a 'U' out of the center of the shelves to fit around the vent pipe.


Next up - more on the kitchen, and a look at the hallway with the newly installed Board and Batten wall treatment! Thanks for visiting! L.


Tuesday, March 25, 2014

A MASTER BEDROOM REDUX

This is one of the projects I have been busy with for the past few months. We're getting the house ready to sell, in order to downsize to a one-story empty-nester, so we are in the process of redesigning our master bedroom and en-suite. We like contemporary design, with a few antiques thrown in, so I built Anna White's Pottery Barn knock-off Farmhouse Bed, and painted it  - with 3 coats of homemade chalk paint and 3 coats of hand waxed lusciousness,  no distressing - in Martha Stewart's Bedford Gray, to give it a more modern feel. I built the bed from pine, using 4x4-inch posts for the legs. I did not have to use wood conditioner to treat the pine before using the chalk paint - love that stuff for so many reasons, this being one of them, and it covered the knot holes beautifully, although I was careful to buy lumber with as few knots as possible. We went to a lumber yard for the wood, instead of one of the big box stores. I altered Anna's plans a bit so I could use pocket hole joinery as much as possible, and the legs are attached with some very long screws. I ordered some bed frame hardware from Rockler, so that we could break the bed down to move it - it weighs a ton! The wall behind the bed is done in her "Seal", a gorgeous, warm, dark gray color. I can't get enough of that color right now. I made the large, print pillow covers from a shower curtain my daughter found at Marshall's. I found a beauty of a bench for $5 at Goodwill, with curvy claw foot legs, that will sit at the foot of the bed when I finish repairing some of the broken trim, and paint it creamy white. I am making a box cushion for it out of charcoal gray pinstripe men's suiting fabric, to balance the yin and yang. I made a paper flower sculpture to go above the bed, in white Bristol board, cut on the Cricut. I'll post the bench when I get it done.

Tuesday, December 31, 2013

DIY Flute Charms


Who doesn't love a chance to get out the "pretty glasses" and make some cute charms for them? Here's a quick way to make your stemware easily recognizable as their own, to your guests:

Using pipe cleaners, wrap around the stem, and slide one end through a small, unbreakable ornament, Slide the other end through, going in the opposite direction. Pull both ends until tightly against the stem. 

Holding your stemware and the base of the ornament in one hand, coil the pipe cleaner around a pencil with the other hand, and push the coil toward the stem to tighten the coil, and slip it off the pencil. Repeat for the other side. 


Gently pull the coils open. Voila! Happy New Year, Everyone!

Monday, September 30, 2013

Can I Bag That for You, Ma'am?


I saw this trick on Pinterest a few weeks ago, and it came in handy this past week when we helped our friends, the Skippers, paint their soon-to-open play-cafe, "Little Skippers", in the Mill Run area of Hilliard, Ohio. My friend, Lori, and I were each painting a bathroom, and I wrapped the toilet tank in a plastic bag to keep from getting paint all over it when I painted behind and under it - a fun job! This worked like a charm!

How to Remove Foam Tape from a Painted Door

I don't know who's idea it was to stick a full-length mirror onto the inside of my husband's closet door using double-sided foam tape (oh, yeah, it was mine), but I promise I will NEVER do it again. I am in the process of painting my way through the second floor of our empty nest, in preparation of selling it and downsizing to some place where all of the rooms are used, 
and that's easier to keep clean. 
I had tried removing this tape before, just after the mirror fell off of the door, but I gave up in frustration. Well, now I HAVE to get it off so I can paint the door. I Googled the how to's, and most of the hints were directed at removing it from auto bodies, where repairing any paint damage could cost hundreds. Not my concern, as I was getting ready to put 2 or 3 new coats of paint on the bad boy, anyway. I tried a couple of ways without any success, then I remembered using the hair dryer to remove Scotch tape that my then-teenage daughter had used on her bedroom walls to hang up her posters of Brad Pitt and who-knows-who-else (...funny, he's the only one I remember). 

Here's what you'll need to get the job done:
  1. a razor-blade-scraper-thingy
  2. a hair dryer with the nozzle  attachment to concentrate the hot air
  3. Goo Gone and a terry cloth rag
  4. Something underfoot to catch all the droppings - I used a big piece of cardboard
I also had a bowl of hot water with a mixture of Dawn dish soap and white vinegar - one of the previously-tried remedies that failed, 
but it came in handy for cleanup. 


One guy suggested not using Goo Gone, since, apparently, it will take off auto paint, but it did nothing to my latex-painted doors. The same guy advised using rubbing alcohol to remove any leftover residue, and that WILL remove latex paint, so don't do that. 

Set the hair dryer on high heat, and hold it as closely as you can to what remains of the foam tape after you tried to get it off initially, for a total of 30 seconds.


Then, quickly scrape off the foam residue, now the consistency of the inside of a toasted marshmallow. For the areas where the foam was thicker, you may need to quickly hit it with an additional 15 seconds of heat, then scrape it again, cleaning off the razor blade often.


This is how the remaining adhesive looked after scraping:


Give the adhesive residue a squirt of Goo Gone, and use a rough, terry cloth rag to easily wipe away the remainder. 
(I'm talkin' like 5 seconds, no elbow grease involved.)


This shot shows that there is now no adhesive left on the door. There is however, some scraped-off paint, as a result of using the razor blade. 
No worries, I am about to repaint.


Use the dishsoap/vinegar combo, or any cleaner of your choice, to clean off any oily residue left by the Goo Gone.

This WORKS, sisters! I was kind of amazed at how fast it went. I had 13 1-inch squares to remove, and it took about 25 minutes. Hope this helps.


LinkWithin

Related Posts with Thumbnails